PIENOISMALLIMARKETTI

Pelikrypta

Näytetään tekstit, joissa on tunniste Rakentaminen. Näytä kaikki tekstit

perjantai 30. joulukuuta 2016

Mordheim: Bridge House part 4 (Final part. Finished bridge house)

Hello. This is 2016 years last project. I really don't have time to build or paint nothing anymore in this year. But the next year is coming and I have lot's of plans to paint miniatures.

Back to Mordheim. This is the last part of building Mordheim bridge house. Actually this part is more like painting than building.

Step 1: Prime the building
I have painted the building with black spray primer. I had to do some minor building in this part. I added a window board. This step is really fast and easy.

House is primed with black spray


Wooden window board. Clued after the priming.

Step 2: Base color and wash
In this phase I have painted the house inside out with the base color. I have used tan, red and blue inside the house. Dark grey and lighter grey outside. Wooden planks are painted with brown. And of course the downstairs with grey color. 

Base color in place. I have used 8 different base color.

After I had done the base color I just washed the whole building with black wash. It prings some of the detail up. And because it is a ruined house it doesn't matter if it look some grimy and dirty. 

After the black wash.
Step 3: The dry brushing
This is the longest part to do. I have dry brushed all walls, floors, dirt and details. Mainly I have used same base color before the wash. Then I have lightened it up with white or similar lighter tone. 
Well in this part I was very interested to paint the building and I did not take pictures of every layer. 

I have painted about 3-5 layers to each sealing or floor sections. 

After the dry brush
I had to do some minor fixing in this phase. I added some more "dirt" on the ground floor. You can see the new dirt in color of grey. 

Some fixing details. Grey dirt. Painted brown after drying. 


Step 4: The finishing touches and details
Last part is the funnest part to do. I can ad some details to bring the ruins more alive. I have added all kind of details what is shown in original card board ruins. Some details I have just done as I see it fit.

Posters, writings, rust, water leaks, blood, Town Cryer magazines and fire place.

Red arrows point some the details what I have done to the ruins. 

Step 5: See the result
After I have done it all. I have taken some pictures and posted it up in my blog. I'm happy to hear some feedback. There is some thinks what I have done better like edges of the ruins. But I'm happy with the result. 

I hope you enjoy the finished Mordheim Bridge house. I have now done all the buildings what come with original game.  

Finished Mordheim Bridge house. 

Bridge house from bird view. 

The bridge is removable for better storage and it will wont take so much damage
 when I move it around the gaming table.

Mordheim
Corner House 1
Corner House 2
The Long House
The Tavern
Bridge House
Monument + Chimney

Next I have to build the Blood on the street expansion. Only problem is that I don't own the expansion yet. If you have the expansion houses and the plastic parts. I might just buy them for the right price. And I need the schematics also!


torstai 8. joulukuuta 2016

Mordheim: Bridge House part 3

Welcome to read about Mordheim Bridge house part 3. This part I will show and try to explain about some small details about the house project. Most of details were done in building process and last details will be done after painting.


Here is the bridge between the houses. I have made it from ice cream sticks and card board. I have used drill to do some nail holes and just a pen to do cracks on cardboard. It was crucial to test the bridge width. It would not be nice that models wont't fit on terrain. After all this made for gaming.


Here is the bridges. 

Even the Minotaur can walk on the bridge. 
 Some details about the bridge. You can see the same details on original card board bridge.
Bridge detailing. 

Downstairs I just used some printed card for making the tiles. Also I was out of Ice Cream sticks and I had to improvise. This is easy and fast method to do surfaces.  Just remember to put some wight on it when it dry or it will go waves.

Also I made some nail holes to the floor blanks.

Downstairs tile pattern.  
When the flooring was ready I made some debris. Just cluing left over sticks and sand. Also I used some cork to do more different debris.

Sand and debris detailing. 
When it is done I have clued the original plastic parts to the house with super clue. It is wise to test that they with the holes before cluing them in place. 

Almost done. Just a minor details missing. 
Last detail is to cut of the rest of the cardboard off from the houses base.  

House don't need this much base. 
 I have done small pins to keep the bridge on place. And also it is easier to paint and store this house after it is ready and in pieces.
Here is the Bridge house pieces

If you like to know more about something. Please be welcome to ask and I will happily to answer you questions. 

Next part is the final part and it is about painting and putting the last small details. It won't be long when it is done. Until the next text! Happy miniaturing!

perjantai 2. joulukuuta 2016

Elf Ranger & Woods and Halloween! (Lot's of Pictures)

Hello! Small update about my lately miniature building. I have re-based lot's of these trees what you can see from the pictures. I have about 50 trees and 20-30 bases to make. First the trees was only in green painted cardboard. They didn't look very nice on the table.

You can see also a Elf Ranger in the picture. It is a Games Workshop model and it's a perfect for Mordheim range.

Also I'm building the Mordheim house and it should be ready to be painted before the Christmas.


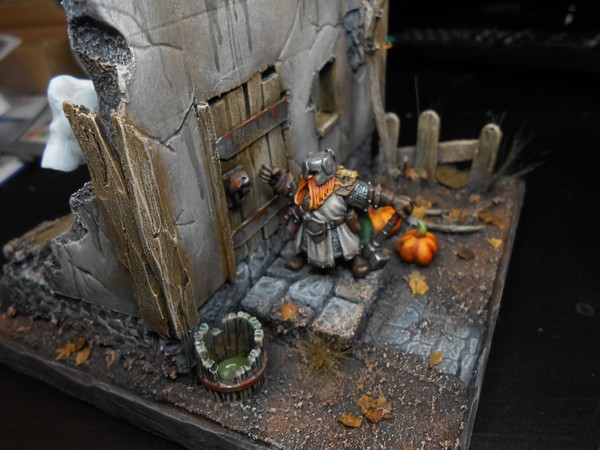
Here is my competition work for local gaming club. Subject was "Halloween" My work is called "knock, KNOCK! Trick or Treat!"

Goblin doing Jack o lantern.


Made pumpkin from green stuff . 
Here is the dwarf doing the knock knock!
Pumpkins, leafs... 
Close up about dwarf. 

Front yard. 


Comment's are always welcome!

perjantai 25. marraskuuta 2016

Mordheim: Bridge House part 2

Hello. November is almost over and I have done the second part of the Mordheim Bridge House. My goal is to build new and better Mordheim house using original plastic parts and use foamboard instead original cardboard walls.

In this second part I have done the basic building. The Building is still lacking most of the plastic parts and almost all detailing.

Enough talking and more pictures. I will explain shorty what I have done in each picture. In the first part I did cut and made the new walls.

1) First I did do some cracks and details to the wall sections. It was more easier to do this way. This is easy part and I have just used the pen to draw the lines and some force. Foamboard is soft material and the crack will show nicely in the painted house.
Here is some crack details to the walls.
2) Next I star testing and assembling the walls. The corner pieces and the beams will with smoothly in their places. I have to do some fine cutting in some sections. As you can see in picture below where I have used the hobby knife to cut of small piece from lower corner.

Assembling the pieces with the plastic beans and corners. 

3) When the pieces with I have used clue to stick the pieces together. I have let the pieces dry over night to be sturdy enough to continue building. I have used 90 degree metal measure to make house dry in to the right angle. I have used hobby clue and plastic clue in these parts.
Here I use the original schematics to build the house. 
4) So here is the second floor. I have used just thin cardboard to make the floor. 
 
Main house is only missing the floor panels.
5) I have gathered ice cream sticks from the summer and I have also bought a pack of them. I don't eat some much ice cream that I can build a house... Or do I?
Some ice cream sticks are good way to do floor blanks. 

6) In the smaller section of the house I have done the floor before cluing it in place.

I have tested how many sticks I need to build the floor.


7) When the floor is done it is time to clue it in place. I have left a small card board slice to make it go under the wall section.


8) I have simply braked the sticks to look like torn apart wooden blanks. Also I have made with hobby knife some carvings and used small drill to make nail holes.

I have made small pin in the side to make floor more sturdy in the house.
9)  Smaller house part is ready.
Here you can see the original section and the new WIP section. 
10) In the larger house section I had clued the card board floor before making the wooden blanks. It was easier to built it that way and I did not had to do so much measuring before hand. I had to use some weight when cluing the floor. It will not dry nicely if it let dry without some weight. The floor is more like wave if not done this way. I have some support in beneath the floor. You can see the paint bottle cap under the floor. 
In larger house I have simply cut and clued the blanks in to the floor. 
11) When I have done the basic assembling it is time to move to detailing. The bridge is not ready yet because I haven't decided will I make it removable for easier storing. 

Assembling completed. 
In the next part I have detailing. I will do the ground floors, dirt, and some other things. If you like to know some more I will happily to answer to questions. 

Keep up the building! 

torstai 10. marraskuuta 2016

Lehdet ja kivetykset malleihin.

Terve. Tänään kirjoittelen suomeksi ja esittelen Pienoismallimarketin tuottamia lehtiä. Itselleni ainakin lehdet ovat helppo ja nopea lisä 28 mm figuureihin tuoda elävyttää pohjaan. Itselläni on vain pieni pussi kokeilukäytössä, mutta nämä ovat jo riittäneet useamman figuurin alustaan.

Värityksiä on useita, kuten syksyn ja kesän väreissä. Valitettasti itselläni ei ollut vielä laittaa muita kuin ruskeita ja muutama vihreä lehti alustaan. Kyseessä siis nämä lehdet. Seuraavaan tilaukseeni kuuluu varmasti punaiset ja keltaiset lehdet.

Samalla olen käyttänyt alustaan valmista kohokivetyskuviota, jota on helppo leikata saksilla ja liimata alustaan. Tämä kohokivetys on Tamyan valmistamaa 1/35 kokoluokkaan tehtyä kivetystä ja sopii erinomaisesti 28 - 32 mm figuureihin myös. Kivetys on helppo maalata ja kuivaharjauksen ansiosta kohokuvi tulee nopeasti näkyviin.

Nykyään alustan tekoni on leikkaa kivetys. Liimaa kivetys. Maalaa kivetys. Korista lehdillä.

Tiedän, että on tulossa lisää monipuolisempia maastonrakennustarvikkeita pienoismallimarkettiin ja pyrinkin kehittämään ja antamaan palautetta tuotteista, että kaikki pienoismalliharrastajat saisivat hyviä ja toimia tuotteita harrastuksen pariin.

Minulle siis voi antaa palautetta pienoismallimarketin maastonrakennustuotteista ja pyrin siis kehittämään tuotetta paremmaksi yhteistyössä pienoismallimarketin kanssa. Samalla Pienoismallimarketti pystyisi kehittämään tuotevalikoimaansa monipuolisemmaksi.

Vinkkinä harrastajille, että Pienoismallimarketista löytyy turffeja, heiniä, lehtiä, tiiliä sekä ym. tuotteita nopeaan maastonrakennukseen.

Tarkkasilmäiset voivat huomata myös lumiefektiputelin kuvassa eli kunhan ehdin esittelen myös vesi- ja lumiefekti tuotteita.

Käytin myös eräässä kilpailutyössä uusia Pienoismallimarketin tuotteita ja esittelen ne kunhan saan kilpailutyöni takaisin!
Kuvassa 28 mm miniatyyri sekä Pienoismallimarketista saatavaa kivetystä ja lehtiä. 


Palautetta saa siis antaa jorinoistani, rakenteluistani ja maalauksistani. Myös voi ehdottaa mitä haluaisit nähdä minut maalaavan seuraavaksi tai tekevän seuraavaksi. Mielelläni kerron myös enemmän seikkailuistani pienoimallien parissa. Facebook

maanantai 31. lokakuuta 2016

Mordheim: Bridge House part 1

Hello. I wanted to re-make the last Mordheim building what is left the Bridge House. Well this original cardboard house wasn't sturdy and it was broken already. So I had no reason to save it.

First step is to plan how I built it and what materials I need. I skipped the planning phase because I have built several these houses already. Mainly I will use foam board, original plastic parts and ice cream sticks.

I have stripped the plastic parts from the house and washed them to remove crease and dust.

Then I simply use the original card parts to draw new wall sections to foam board.

Next time I will show how do I make the walls more alive and assemble the house but now I must to go cut the new walls out of foam.

Planning and I have schematics to this house.


washed all plastic parts with dish washing fluid. 
Used these wall sections to draw them to foam board
Here is couple ready buildings. It should look something like these when it is ready. You can find more about these buildings from my older blog post! Use the word Mordheim or terrain to find these.


Tavern


Corner house

torstai 30. kesäkuuta 2016

Painting Necromunda Juve Part 5

The part 5 is here. This part I usually do the base.

It depends about the model what kind of base I do. For the Necromunda because it nature of Hive city. Junk, dirty and urban environment. Yeah there is some cleaner and nicer places in Hive but the gangers mostly life in factory or some kind of lawless area.

Here is m base for Necromunda:

1. I clue some beams, junk, net or platforms to the base. And some texture paint.
2. Then I use black paint to do priming
3. Do the base colors and shading
4. Highlight the base colors and do some dry brushing
5. details.. like painting rust or warning lines.

Here is the almost finished base.  I will paint the edge with grey.

Cluing some items to the base
Cut it nice when dried. I used super clue
Put some primer before painting


keskiviikko 23. maaliskuuta 2016

Uutta maastomateriaalia Pienoismallimarketissa

Pienoismallimarketti laajensi maastomateriaali tarvikkeitaan.

Uutena löytyy ainakin erilaiset puidenlehdet 1/35 kokoon ja ne sopivat mainiosti myös 28 mm figuureille. Lisäksi on tullut ruohotupsuja ja tiiliskiviä samaan kokoon. 

Pienoismallimarketti lähetti minulle mallierän lehtiä tutustumistarkoituksessa. Pienoismallimarketissa on siis useita eri malleja ja värityksiä lehtiä.

Mallilehdet olivat vihreitä eli ns. tuoreita tammenlehtiä. Kokeilin liimata muutaman viidakkomiehen alustaan. Lehdet kyllä luovat persoonallisuutta varsinkin, jos niitä käyttäisi esim. hyvällä kontrastipohjalla. Materiaali on paperia ja huomasin, että pikaliima hiukan tulee läpi joten seuraavat lehdet liimaan erikeepperillä. 

Tammenlehtiä. Vieressä oleva figuuri on 28 mm scaalassa ja alusta on 25 mm kokoinen. 

Alustaan liimattu muutamalehti. Peinoismallimarketista saa myös alustassa olevia ruohotupsuja. 

Kellertävät tiiliskivet täydentävät sopivasti raunioita tai vaikka suoraan alustaan. Figuuri on vain antamassa mittakaavaa. Figuurin koko on siis 28 mm 
Tiilet ovat maalaamattomia. 
Peinoismallimarketti aikaisemmin laajensi valikoimaansa Vallejon game color maalit. 

perjantai 26. helmikuuta 2016

Modular gaming board: Jungle vs. Cave!

Hello!

I had a vision and  I dreamed of good solid gaming boards. Well I decided to do some easy two sided gaming board.

This board is not the nicest and does not take much of time to make. Well I had this 2' x 4' (60 cm x 120 cm) foam board. To other side I painted grey terrain to simulate the caves or even modern city street. To other side I just simply clued old paper gaming mat.

I have second part coming up as I write this. The grey side only needs some white dry brushing and then I clue the mat other side and let it dry whole night.

Jungle, woodland, plains

Just flip it and I have...

cave, dungeon or city.

PS. I have lot's of dungeon terrain coming up and some woodland. Stay tuned!


tiistai 8. joulukuuta 2015

Water Still & Cover!

Hello today I managed to build some terrain to Necromunda. Well I actually build it little pit at the time before, but got it finally painted.

I will present some original terrain and my version of it. Everybody knows what cover is for... Right? Well but water still is used as a objective in some scenarios in Necromunda game. And it is supposed to give some fresh unpolluted water in hive city.

If you think the original terrain is better then I'm failed.
Original cover and Water still.

My version of the original water still and cover.