PIENOISMALLIMARKETTI

Pelikrypta

Näytetään tekstit, joissa on tunniste WIP. Näytä kaikki tekstit

perjantai 30. joulukuuta 2016

Mordheim: Bridge House part 4 (Final part. Finished bridge house)

Hello. This is 2016 years last project. I really don't have time to build or paint nothing anymore in this year. But the next year is coming and I have lot's of plans to paint miniatures.

Back to Mordheim. This is the last part of building Mordheim bridge house. Actually this part is more like painting than building.

Step 1: Prime the building
I have painted the building with black spray primer. I had to do some minor building in this part. I added a window board. This step is really fast and easy.

House is primed with black spray


Wooden window board. Clued after the priming.

Step 2: Base color and wash
In this phase I have painted the house inside out with the base color. I have used tan, red and blue inside the house. Dark grey and lighter grey outside. Wooden planks are painted with brown. And of course the downstairs with grey color. 

Base color in place. I have used 8 different base color.

After I had done the base color I just washed the whole building with black wash. It prings some of the detail up. And because it is a ruined house it doesn't matter if it look some grimy and dirty. 

After the black wash.
Step 3: The dry brushing
This is the longest part to do. I have dry brushed all walls, floors, dirt and details. Mainly I have used same base color before the wash. Then I have lightened it up with white or similar lighter tone. 
Well in this part I was very interested to paint the building and I did not take pictures of every layer. 

I have painted about 3-5 layers to each sealing or floor sections. 

After the dry brush
I had to do some minor fixing in this phase. I added some more "dirt" on the ground floor. You can see the new dirt in color of grey. 

Some fixing details. Grey dirt. Painted brown after drying. 


Step 4: The finishing touches and details
Last part is the funnest part to do. I can ad some details to bring the ruins more alive. I have added all kind of details what is shown in original card board ruins. Some details I have just done as I see it fit.

Posters, writings, rust, water leaks, blood, Town Cryer magazines and fire place.

Red arrows point some the details what I have done to the ruins. 

Step 5: See the result
After I have done it all. I have taken some pictures and posted it up in my blog. I'm happy to hear some feedback. There is some thinks what I have done better like edges of the ruins. But I'm happy with the result. 

I hope you enjoy the finished Mordheim Bridge house. I have now done all the buildings what come with original game.  

Finished Mordheim Bridge house. 

Bridge house from bird view. 

The bridge is removable for better storage and it will wont take so much damage
 when I move it around the gaming table.

Mordheim
Corner House 1
Corner House 2
The Long House
The Tavern
Bridge House
Monument + Chimney

Next I have to build the Blood on the street expansion. Only problem is that I don't own the expansion yet. If you have the expansion houses and the plastic parts. I might just buy them for the right price. And I need the schematics also!


torstai 8. joulukuuta 2016

Mordheim: Bridge House part 3

Welcome to read about Mordheim Bridge house part 3. This part I will show and try to explain about some small details about the house project. Most of details were done in building process and last details will be done after painting.


Here is the bridge between the houses. I have made it from ice cream sticks and card board. I have used drill to do some nail holes and just a pen to do cracks on cardboard. It was crucial to test the bridge width. It would not be nice that models wont't fit on terrain. After all this made for gaming.


Here is the bridges. 

Even the Minotaur can walk on the bridge. 
 Some details about the bridge. You can see the same details on original card board bridge.
Bridge detailing. 

Downstairs I just used some printed card for making the tiles. Also I was out of Ice Cream sticks and I had to improvise. This is easy and fast method to do surfaces.  Just remember to put some wight on it when it dry or it will go waves.

Also I made some nail holes to the floor blanks.

Downstairs tile pattern.  
When the flooring was ready I made some debris. Just cluing left over sticks and sand. Also I used some cork to do more different debris.

Sand and debris detailing. 
When it is done I have clued the original plastic parts to the house with super clue. It is wise to test that they with the holes before cluing them in place. 

Almost done. Just a minor details missing. 
Last detail is to cut of the rest of the cardboard off from the houses base.  

House don't need this much base. 
 I have done small pins to keep the bridge on place. And also it is easier to paint and store this house after it is ready and in pieces.
Here is the Bridge house pieces

If you like to know more about something. Please be welcome to ask and I will happily to answer you questions. 

Next part is the final part and it is about painting and putting the last small details. It won't be long when it is done. Until the next text! Happy miniaturing!

maanantai 31. lokakuuta 2016

Mordheim: Bridge House part 1

Hello. I wanted to re-make the last Mordheim building what is left the Bridge House. Well this original cardboard house wasn't sturdy and it was broken already. So I had no reason to save it.

First step is to plan how I built it and what materials I need. I skipped the planning phase because I have built several these houses already. Mainly I will use foam board, original plastic parts and ice cream sticks.

I have stripped the plastic parts from the house and washed them to remove crease and dust.

Then I simply use the original card parts to draw new wall sections to foam board.

Next time I will show how do I make the walls more alive and assemble the house but now I must to go cut the new walls out of foam.

Planning and I have schematics to this house.


washed all plastic parts with dish washing fluid. 
Used these wall sections to draw them to foam board
Here is couple ready buildings. It should look something like these when it is ready. You can find more about these buildings from my older blog post! Use the word Mordheim or terrain to find these.


Tavern


Corner house

torstai 30. kesäkuuta 2016

Painting Necromunda Juve Part 5

The part 5 is here. This part I usually do the base.

It depends about the model what kind of base I do. For the Necromunda because it nature of Hive city. Junk, dirty and urban environment. Yeah there is some cleaner and nicer places in Hive but the gangers mostly life in factory or some kind of lawless area.

Here is m base for Necromunda:

1. I clue some beams, junk, net or platforms to the base. And some texture paint.
2. Then I use black paint to do priming
3. Do the base colors and shading
4. Highlight the base colors and do some dry brushing
5. details.. like painting rust or warning lines.

Here is the almost finished base.  I will paint the edge with grey.

Cluing some items to the base
Cut it nice when dried. I used super clue
Put some primer before painting


tiistai 28. kesäkuuta 2016

Painting Necromunda Juve Part 4

Layers, layers layers... this is the hardest and the most fun part to see the miniature come to life.

After the basic paint it is time to give some highlights. First I start applying  same base colors before shading. Then I star mixing some more lighter tone paints and star filling up very thin layers. I use only water based colors because it is easy to thin them to ad these thin layers.

when I am happy with the layers I add some details and fix some errors with darker tone or with wash. I do not use much of a dry brushing for details.

Make sure you have some very small brush for the details. I have noticed that it is very much easier to paint details like eyes with small brushes.

Here is the example. Escher juve got about 3-5 layers of skin tone. And then I added details like eyes and make up.

I had to do some fixing because I was very tired because lack of sleep.  Painting  as tired I made too much errors and my hand and eye coordination was not very good. Also I could not focus very well. So I decided to keep painting some other day. Remember to keep breaks and paint when you are happy and in the right mood to do some nice paint ups.

But here is the picture!

Some layering and details! 

Here is some small fixes on skin and also shirt is layered with same way. 

Please be free to comment!

torstai 23. kesäkuuta 2016

Painting Necromunda Juve Part 3

Wellcome to see my Juve painting part 3.

This part I have done the shading for the model. I have shaded all model with different colors. Mainly using same kind of color to same base color. Blue on blue and so on.

I have used:
-Skin shade
-Brown shade
-Black shade
-Blue shade
-And one mixed red+yellow+brown shade for the orange top.

Here is the shaded model. Next I will start highlighting and adding details.


tiistai 21. kesäkuuta 2016

Painting Necromunda Juve Part 2

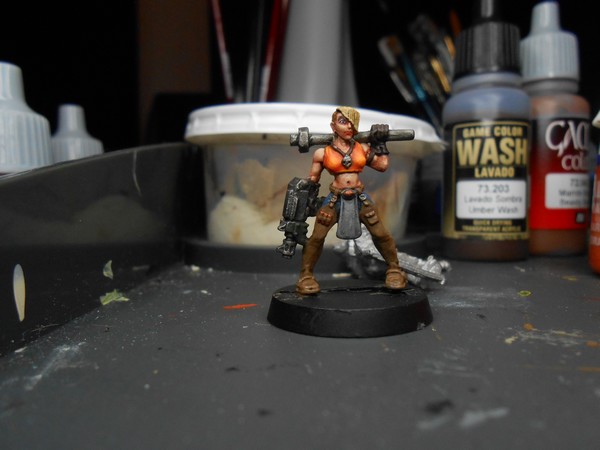
Hello. Here is the second part of painting the Necromunda Juve. I decided to paint escher Juve.

After black primer I have applied the base coat. I roughly painted the main colors to the miniature.

I have chosen little darker base colors because it is easier to highlight them after.

In this stage there is nothing fancy. I might still do some more details before shading and start applying the highlights.

WIP Escher Juve

sunnuntai 3. tammikuuta 2016

More Necromunda Guilders!

Here is my next Guilder ganger. This one is heavy with heavy stubber. Used many model parts to build this one.

Campaign is nearly here and I'm still missing two models from starting warband.

Heavy with heavy stubber

My next pack slave. 

perjantai 4. joulukuuta 2015

Back in Hive City!

Hello again! I have finally started to build more Necromunda Hive City... I have started to built new water still and some cover. I have used original cardboard pieces as inspirations. Also I have finished my leader to guilder gang! So you can except that next is coming lots of more Necromunda. I have plans to paint some original minis to this gang also. 

Guilder leader in front of original Water Still. 

Some WIP mercenaries who are eager to join guild.

Some WIP cover and water still. You can se original covers. 

perjantai 10. heinäkuuta 2015

Summeri!

Ei se TV-ohjelma! Vaan oikea kesä, häiritsee vaan pienoismallien tekemistä. Kesäharrastukset vie aikaa figuilusta... mutta tässä jotain mitä on tulossa! Kääpiöitäkin on sikissyt paljon kaivoksistaan... mutta kuvat tulee myöhemmin.

Finnish joke. It's Tv-Show which is called summer and now is summer in here. 15 degrees warm and raining water! 

Anyway summer games took my time and I don't have time to do models as normal... but here is more sneak peak what I'm recruiting to fall Necromunda campaign. 

Viidestä eri mallista osia tässä sankarissa.
Used 5 different models to built this figure. 


torstai 2. heinäkuuta 2015

Green stuffia on vaikea masteroida...

Eilen tein yli tunnin pelkästään puolituisen hiuksia... Ainakin 7 kertaa otin aineen pois ja aloitin alusta. Hiukset eivät millään osuneet oikein... Kunnes sitten ne olivat kohdallaan. Toisen figuurin kohdalla ne olivat heti eikä melkein kunnossa.

En hallitse kunnolla green stuffia ja nykyinen Necromunda jengi projektini vaatii paljon muokkausta kyseisellä aineella... Ai miksikö käytän paljon GStuffia? Siksi että haluan tehdä uniikin porukan, joita muilla ei ole kaupasta ostamalla.

Tässä siis ensimmäiset kolme soturia...

Ja tässä seuraavat kaksi. En pidä kotkista joten jouduin tekemään uuden vyösoljenkin. Siihenkin meni aikaa ihan tuhottomasti.

Kolme ensimmäistä soturia. 


Tosin sain sentään kunnon aseen tehtyä tarkka-ampujalle nössön neulakiväärin sijaan...


Ekaa figuuria ei ole vielä muokattu. Kotka rinnasta lähtee pois! Ratling voipi saada puukon tai jonkin muun varusteen roikkumaan.
Jos haluat lukea englanniksi käytä google kääntäjää...

sunnuntai 28. kesäkuuta 2015

Necromunda new Gang WIP

Well started to build new Necromunda gang. I'm Building the Guilder gang. It is experimental gang and it's not official. It was published in Necromunda magazine.

Gang consist of guilder, mercenaries, heavies, pack slaves and pit slaves. Gang gives a very good change to built very unique gang.

The only cons is that the gang don't get any terrain to keep so they will not have any advanced for tunnels or vents or other places like friendly docs.

So here is the firs gangers!

Some mercs WIP and a pac slave

Merc got some mollet and pack slave have a cargo chain!

perjantai 12. kesäkuuta 2015

Mordheim The Tavern WIP Part 3

Perusvärit maalattuna. Meni noin 60 minuuttia. Illemmalla ennen nukkumaan menoa vielä musta washaus. Huomasin, että sisältä puuttuu muutama puupalkki, jotka on piirrtty alkuperäiseen kuvioon. No liimailen ne sitten lopuksi kun teen kyltinkin.

Basic Colors are painted. It took 60 minutes. At night before going for sleep I will wash this thing with black. I noticed that inside there is missing wooden beam which is painted in original cardboard. I will ad it when I'm making the sign. 


Basic color eli perusvärit

torstai 11. kesäkuuta 2015

Mordheim The Tavern WIP Part 2

Pieni päivitys Tavernan rakentamiseen. Tai oikeastaan rakentaminen on valmis. Odotan vain liiman kuivumista jotta voi maalata koko höskän.

Small update to Tavern. Or actually buiilding is done. Just waiting glue to dry that I can paint this ruin.

Edestä
Front side

Takaosa
Back side

Ehkä pieniä detaileja tulee kuten taverna kyltti. Alkuperäistä ei ole, mutta jos joku voisi sellaisen lahjoittaa ehkä kolikkoa vastaan...

Small details is coming like Tavern sign, I don't have the original, but hope I find somewhere it.

maanantai 8. kesäkuuta 2015

Mordheim The Tavern WIP 1

Tänään päätin tehdä Tavernan kehikon. Seuraavaksi blogitekstissä varmaan detailit

Today I desided to do Tavern. Next I will post the details what I have added.

Eihän tuo englanninnus mennyt yhtään putkeen...

Pällistelkää kuvia! Watch pictures!

Pohjaspiirros ja etukuva
Schematicsss.. Schemmatikc.. Sh.. 

Sisältä.
Inside

lauantai 30. toukokuuta 2015

Mordheim: The Long House WIP 1/2 (ready to be painted!)

Mordheim: The Long House WIP 1/2


1. Leikkaa sopivat palat kapalevystä
1. Cut out the parts from foamboard


Leikkasin ja muokkasin osat alkuperäisten pahviosien mukaan.
Cutted and molded by orginal parts

2. Pese alkuperäiset muoviosat. 
2. Wash the orginal plastic parts.
Rasvajäämät voivat vaikuttaa maalin tarttumiseen. Joten pesin osat fairyllä.
Crease spots may affect to paint not to stay. So I washed plastic parts with dishwash soap
3. Liimaa osat kuten alkuperäiset pahviosat. 
3. Glue the parts as the orginal cardboard pieces

Liimailin osat ja tein jäätelötikuista lattialaudoituksen
Glued the parts and made floor from ice cream sticks

4. Tee vähän rojua. Heikkaa ja tikunpalasia
4. Make some rubble. Sand and stick pieces.
Vähän hiekkaa ja rojua yksityiskohdiksi
Little sand and stuff for details

5. Odota liiman kuivumista.
5. Wait glue to dry

Seraavalla kerralla maalaus
Next time painting.


lauantai 23. toukokuuta 2015

Mordheim: The Long House Starting now

Terve. Uutta projektia pukkaa eli Mordheim aloituslaatikon The Long House niminen rakennus. Talo on suht simppeli, joten en usko, että menee pitkään kun tämä on kasassa.

Kapalevystä rakennan seinät sekä käytän alkuperäisiä muoviosia. Lattialaudat teen jäätelotikuista.

Hello. I'm starting now new Mordheim project. This time I'm building the Long House from the orginal Mordheim box. 

I'm usinf foamboard to walls and orginal plastic pits. Planks I'm making from ice cream sticks. 
Pohjapiirros
Blue prints

Orginaali pahvitalo
The orginal cardboard house