PIENOISMALLIMARKETTI

Pelikrypta

Näytetään tekstit, joissa on tunniste terrain. Näytä kaikki tekstit

tiistai 3. tammikuuta 2017

My Mordheim

Here it is. This is my version of Mordheim buidings. I have remade all Mordheim ruins from foam board and added some details.

You can find WIP text, pics and post from my blog how I managed to do this all.

This post is sortie like other post. So enjoy the pictures.

This is how the cardboard houses looked like. 

This is how I made it.

Happy new year and may there be miniatures!


perjantai 2. joulukuuta 2016

Elf Ranger & Woods and Halloween! (Lot's of Pictures)

Hello! Small update about my lately miniature building. I have re-based lot's of these trees what you can see from the pictures. I have about 50 trees and 20-30 bases to make. First the trees was only in green painted cardboard. They didn't look very nice on the table.

You can see also a Elf Ranger in the picture. It is a Games Workshop model and it's a perfect for Mordheim range.

Also I'm building the Mordheim house and it should be ready to be painted before the Christmas.


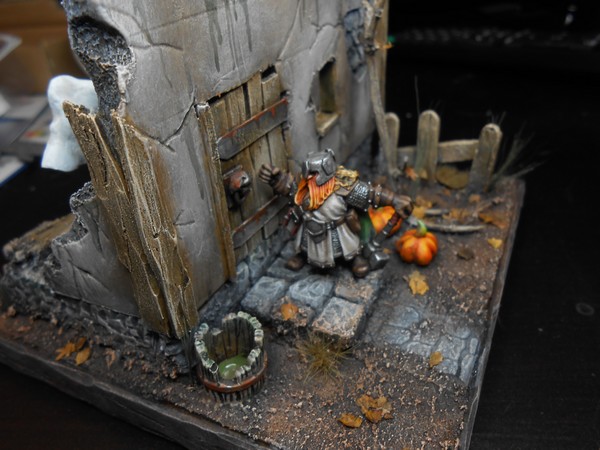
Here is my competition work for local gaming club. Subject was "Halloween" My work is called "knock, KNOCK! Trick or Treat!"

Goblin doing Jack o lantern.


Made pumpkin from green stuff . 
Here is the dwarf doing the knock knock!
Pumpkins, leafs... 
Close up about dwarf. 

Front yard. 


Comment's are always welcome!

perjantai 25. marraskuuta 2016

Mordheim: Bridge House part 2

Hello. November is almost over and I have done the second part of the Mordheim Bridge House. My goal is to build new and better Mordheim house using original plastic parts and use foamboard instead original cardboard walls.

In this second part I have done the basic building. The Building is still lacking most of the plastic parts and almost all detailing.

Enough talking and more pictures. I will explain shorty what I have done in each picture. In the first part I did cut and made the new walls.

1) First I did do some cracks and details to the wall sections. It was more easier to do this way. This is easy part and I have just used the pen to draw the lines and some force. Foamboard is soft material and the crack will show nicely in the painted house.
Here is some crack details to the walls.
2) Next I star testing and assembling the walls. The corner pieces and the beams will with smoothly in their places. I have to do some fine cutting in some sections. As you can see in picture below where I have used the hobby knife to cut of small piece from lower corner.

Assembling the pieces with the plastic beans and corners. 

3) When the pieces with I have used clue to stick the pieces together. I have let the pieces dry over night to be sturdy enough to continue building. I have used 90 degree metal measure to make house dry in to the right angle. I have used hobby clue and plastic clue in these parts.
Here I use the original schematics to build the house. 
4) So here is the second floor. I have used just thin cardboard to make the floor. 
 
Main house is only missing the floor panels.
5) I have gathered ice cream sticks from the summer and I have also bought a pack of them. I don't eat some much ice cream that I can build a house... Or do I?
Some ice cream sticks are good way to do floor blanks. 

6) In the smaller section of the house I have done the floor before cluing it in place.

I have tested how many sticks I need to build the floor.


7) When the floor is done it is time to clue it in place. I have left a small card board slice to make it go under the wall section.


8) I have simply braked the sticks to look like torn apart wooden blanks. Also I have made with hobby knife some carvings and used small drill to make nail holes.

I have made small pin in the side to make floor more sturdy in the house.
9)  Smaller house part is ready.
Here you can see the original section and the new WIP section. 
10) In the larger house section I had clued the card board floor before making the wooden blanks. It was easier to built it that way and I did not had to do so much measuring before hand. I had to use some weight when cluing the floor. It will not dry nicely if it let dry without some weight. The floor is more like wave if not done this way. I have some support in beneath the floor. You can see the paint bottle cap under the floor. 
In larger house I have simply cut and clued the blanks in to the floor. 
11) When I have done the basic assembling it is time to move to detailing. The bridge is not ready yet because I haven't decided will I make it removable for easier storing. 

Assembling completed. 
In the next part I have detailing. I will do the ground floors, dirt, and some other things. If you like to know some more I will happily to answer to questions. 

Keep up the building! 

keskiviikko 2. marraskuuta 2016

Who let the Dogs out!

WOUH! wouh! wouh! Wouh! Echoed from the street of Mordheim. Witch hunter captain pointed his finger into the dark street and yelled "PURE THE UNCLEAN!" Poor warlock last reflection in his eyes where vicious dogs was running towards him. WOUH! wouh! wouh! Wouh! Echoed from the street of Mordheim.

Hunters prey. 


I promised to paint five original Mordheim miniatures this year. Actually I have painted six. One Warlock, Captain, two flagellants and two hounds. I have taken a small picture of the last dogs. Also here is the picture of my witch hunters and all this year painted Mordheim miniatures.

I still have lot of broken and missing parts witch hunter miniatures which I'm maybe going to mod some new and different weapons variations for Mordheim.

Here is the new Mordheim hounds!
I'm very happy about the result about these hounds. Two of them are painted about couple years ago when I wasn't as good painter as I'm now. Small amount about wash or ink I might do more visible details to these two older hounds.


Here is the all four Mordheim Hounds!


Here is my all original Witch hunter warband. I'm still missing one model. The one witch hunter with the great sword.


Ready to adventure into the darkness. 

maanantai 31. lokakuuta 2016

Mordheim: Bridge House part 1

Hello. I wanted to re-make the last Mordheim building what is left the Bridge House. Well this original cardboard house wasn't sturdy and it was broken already. So I had no reason to save it.

First step is to plan how I built it and what materials I need. I skipped the planning phase because I have built several these houses already. Mainly I will use foam board, original plastic parts and ice cream sticks.

I have stripped the plastic parts from the house and washed them to remove crease and dust.

Then I simply use the original card parts to draw new wall sections to foam board.

Next time I will show how do I make the walls more alive and assemble the house but now I must to go cut the new walls out of foam.

Planning and I have schematics to this house.


washed all plastic parts with dish washing fluid. 
Used these wall sections to draw them to foam board
Here is couple ready buildings. It should look something like these when it is ready. You can find more about these buildings from my older blog post! Use the word Mordheim or terrain to find these.


Tavern


Corner house

torstai 30. kesäkuuta 2016

Painting Necromunda Juve Part 5

The part 5 is here. This part I usually do the base.

It depends about the model what kind of base I do. For the Necromunda because it nature of Hive city. Junk, dirty and urban environment. Yeah there is some cleaner and nicer places in Hive but the gangers mostly life in factory or some kind of lawless area.

Here is m base for Necromunda:

1. I clue some beams, junk, net or platforms to the base. And some texture paint.
2. Then I use black paint to do priming
3. Do the base colors and shading
4. Highlight the base colors and do some dry brushing
5. details.. like painting rust or warning lines.

Here is the almost finished base.  I will paint the edge with grey.

Cluing some items to the base
Cut it nice when dried. I used super clue
Put some primer before painting


keskiviikko 23. maaliskuuta 2016

Uutta maastomateriaalia Pienoismallimarketissa

Pienoismallimarketti laajensi maastomateriaali tarvikkeitaan.

Uutena löytyy ainakin erilaiset puidenlehdet 1/35 kokoon ja ne sopivat mainiosti myös 28 mm figuureille. Lisäksi on tullut ruohotupsuja ja tiiliskiviä samaan kokoon. 

Pienoismallimarketti lähetti minulle mallierän lehtiä tutustumistarkoituksessa. Pienoismallimarketissa on siis useita eri malleja ja värityksiä lehtiä.

Mallilehdet olivat vihreitä eli ns. tuoreita tammenlehtiä. Kokeilin liimata muutaman viidakkomiehen alustaan. Lehdet kyllä luovat persoonallisuutta varsinkin, jos niitä käyttäisi esim. hyvällä kontrastipohjalla. Materiaali on paperia ja huomasin, että pikaliima hiukan tulee läpi joten seuraavat lehdet liimaan erikeepperillä. 

Tammenlehtiä. Vieressä oleva figuuri on 28 mm scaalassa ja alusta on 25 mm kokoinen. 

Alustaan liimattu muutamalehti. Peinoismallimarketista saa myös alustassa olevia ruohotupsuja. 

Kellertävät tiiliskivet täydentävät sopivasti raunioita tai vaikka suoraan alustaan. Figuuri on vain antamassa mittakaavaa. Figuurin koko on siis 28 mm 
Tiilet ovat maalaamattomia. 
Peinoismallimarketti aikaisemmin laajensi valikoimaansa Vallejon game color maalit. 

perjantai 26. helmikuuta 2016

Modular gaming board: Jungle vs. Cave!

Hello!

I had a vision and  I dreamed of good solid gaming boards. Well I decided to do some easy two sided gaming board.

This board is not the nicest and does not take much of time to make. Well I had this 2' x 4' (60 cm x 120 cm) foam board. To other side I painted grey terrain to simulate the caves or even modern city street. To other side I just simply clued old paper gaming mat.

I have second part coming up as I write this. The grey side only needs some white dry brushing and then I clue the mat other side and let it dry whole night.

Jungle, woodland, plains

Just flip it and I have...

cave, dungeon or city.

PS. I have lot's of dungeon terrain coming up and some woodland. Stay tuned!


tiistai 8. joulukuuta 2015

Water Still & Cover!

Hello today I managed to build some terrain to Necromunda. Well I actually build it little pit at the time before, but got it finally painted.

I will present some original terrain and my version of it. Everybody knows what cover is for... Right? Well but water still is used as a objective in some scenarios in Necromunda game. And it is supposed to give some fresh unpolluted water in hive city.

If you think the original terrain is better then I'm failed.
Original cover and Water still.

My version of the original water still and cover.


perjantai 4. joulukuuta 2015

Back in Hive City!

Hello again! I have finally started to build more Necromunda Hive City... I have started to built new water still and some cover. I have used original cardboard pieces as inspirations. Also I have finished my leader to guilder gang! So you can except that next is coming lots of more Necromunda. I have plans to paint some original minis to this gang also. 

Guilder leader in front of original Water Still. 

Some WIP mercenaries who are eager to join guild.

Some WIP cover and water still. You can se original covers. 

sunnuntai 14. kesäkuuta 2015

Mordheim The Tavern FINISHED

Noniin nyt se on maaleissa. Tämä oli ehdottomasti vaikein maalattava ja rakennettava tähän mennessä.

Now it's painted. This was definitely the hardest to paint and built so far. 


Etupuoli. Punainen on vaikea väri.
Frontside. Red color is hard to paint
Takapuoli. Spottaa Death Card
Backside. Spot the Death Card


Palkit alakerrassa on balsasta jotka jäi rakennusvaiheessa pois. Kuvassa vasemmalla on alkupeärinen kuva.
Downstairs beams I had to from wood after painting, because I forgot to ad them when building. Original wall in left in picture
Alakerrassa ja keskitasossa kaksi maalausta seinällä kuten alkuperäisessä
Two paintings in walls like in original terrain.
Rakennus on silti vain 99% valmis. Puuttuu vielä Taverna kyltti ja ilmoitus oviaukon viereltä.

This building is still only 99 % complete. It's still missing the tavern sign and notification neat the out door. 


PS.
Mordheim
Corner House 1
Corner House 2
The Long House
The Tavern
Bridge House
Monument + Chimney
+ Bringing life

ONE MORE!!!

perjantai 12. kesäkuuta 2015

Mordheim The Tavern WIP Part 3

Perusvärit maalattuna. Meni noin 60 minuuttia. Illemmalla ennen nukkumaan menoa vielä musta washaus. Huomasin, että sisältä puuttuu muutama puupalkki, jotka on piirrtty alkuperäiseen kuvioon. No liimailen ne sitten lopuksi kun teen kyltinkin.

Basic Colors are painted. It took 60 minutes. At night before going for sleep I will wash this thing with black. I noticed that inside there is missing wooden beam which is painted in original cardboard. I will ad it when I'm making the sign. 


Basic color eli perusvärit

torstai 11. kesäkuuta 2015

Mordheim The Tavern WIP Part 2

Pieni päivitys Tavernan rakentamiseen. Tai oikeastaan rakentaminen on valmis. Odotan vain liiman kuivumista jotta voi maalata koko höskän.

Small update to Tavern. Or actually buiilding is done. Just waiting glue to dry that I can paint this ruin.

Edestä
Front side

Takaosa
Back side

Ehkä pieniä detaileja tulee kuten taverna kyltti. Alkuperäistä ei ole, mutta jos joku voisi sellaisen lahjoittaa ehkä kolikkoa vastaan...

Small details is coming like Tavern sign, I don't have the original, but hope I find somewhere it.

maanantai 8. kesäkuuta 2015

Mordheim The Tavern WIP 1

Tänään päätin tehdä Tavernan kehikon. Seuraavaksi blogitekstissä varmaan detailit

Today I desided to do Tavern. Next I will post the details what I have added.

Eihän tuo englanninnus mennyt yhtään putkeen...

Pällistelkää kuvia! Watch pictures!

Pohjaspiirros ja etukuva
Schematicsss.. Schemmatikc.. Sh.. 

Sisältä.
Inside