Back to Mordheim. This is the last part of building Mordheim bridge house. Actually this part is more like painting than building.
Step 1: Prime the building
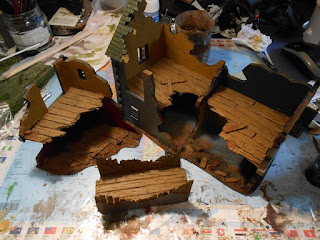
I have painted the building with black spray primer. I had to do some minor building in this part. I added a window board. This step is really fast and easy.
 |
| House is primed with black spray |
 |
| Wooden window board. Clued after the priming. |
Step 2: Base color and wash
In this phase I have painted the house inside out with the base color. I have used tan, red and blue inside the house. Dark grey and lighter grey outside. Wooden planks are painted with brown. And of course the downstairs with grey color.
 |
| Base color in place. I have used 8 different base color. |
After I had done the base color I just washed the whole building with black wash. It prings some of the detail up. And because it is a ruined house it doesn't matter if it look some grimy and dirty.
 |
| After the black wash. |
Step 3: The dry brushing
This is the longest part to do. I have dry brushed all walls, floors, dirt and details. Mainly I have used same base color before the wash. Then I have lightened it up with white or similar lighter tone.
Well in this part I was very interested to paint the building and I did not take pictures of every layer.
I have painted about 3-5 layers to each sealing or floor sections.
 |
| After the dry brush |
 |
| Some fixing details. Grey dirt. Painted brown after drying. |
Step 4: The finishing touches and details
Last part is the funnest part to do. I can ad some details to bring the ruins more alive. I have added all kind of details what is shown in original card board ruins. Some details I have just done as I see it fit.
Posters, writings, rust, water leaks, blood, Town Cryer magazines and fire place.
 |
| Red arrows point some the details what I have done to the ruins. |
Step 5: See the result
After I have done it all. I have taken some pictures and posted it up in my blog. I'm happy to hear some feedback. There is some thinks what I have done better like edges of the ruins. But I'm happy with the result.
I hope you enjoy the finished Mordheim Bridge house. I have now done all the buildings what come with original game.
 |
| Finished Mordheim Bridge house. |
 |
| Bridge house from bird view. |
 |
| The bridge is removable for better storage and it will wont take so much damage when I move it around the gaming table. |
Mordheim
Corner House 1
Corner House 2
The Long House
The Tavern
Bridge House
Monument + Chimney
Next I have to build the Blood on the street expansion. Only problem is that I don't own the expansion yet. If you have the expansion houses and the plastic parts. I might just buy them for the right price. And I need the schematics also!
Next I have to build the Blood on the street expansion. Only problem is that I don't own the expansion yet. If you have the expansion houses and the plastic parts. I might just buy them for the right price. And I need the schematics also!


I love it!
VastaaPoistaI especially love the weathering and details.
I wish I could do as good of a job as you with your flat surfaces. How many layers and what techniques do you use on the yellow wall for example?
What I will do, though, is to shamelessly steal that "plaster over planks" look, what you got going on the bridge.
Thanks. I have used just dry brush technique.
PoistaBase color, black wash and three to five layers of base color. I have used some white paint to lighten up the color for layers.
Be my quest to steal that technique. Just happy to give some new ideas! :)