PIENOISMALLIMARKETTI

Pelikrypta

Näytetään tekstit, joissa on tunniste Painting. Näytä kaikki tekstit

tiistai 11. heinäkuuta 2017

Tales from the Sump!

The Sump

What is the Sump? It is the lowest parts of Necromunda hive city. Nobody lives in these parts because it is toxic or poisonous area. Only mutated creatures live there... And because of that I can paint monsters from there. 

One common monster what lives in sump is plague zombie. Poor gangers, enforces or hivers have been bitten by these walkers making them to join their ranks. Only the strongest or luckiest have survived from these bites. 

 There is rules for playing with zombies in necromunda. But be warned. Your gang might meet their doom against these rotten walkers. 

There is six original sculpts of Plague zombies. I have four of them and I have just finished painting the third. This zombie represent a poor ganger. Maybe a juve who have been a careless.


The Haunt of Horror!


PS. I have lately had very slow update rate about my posts. Don't worry. I'm up to something big. I will  update more pics to my FB because it's more easier and I'm not tied to my desktop computer.

You can see glint of my newest terrain project behind the zombie.   

maanantai 15. toukokuuta 2017

Look, I'm telling ya, there's somethin' movin' and it ain't us!

1986 somebody did sequel for alien movie. It was called aliens and it is one of the best movies what I have seen. Now we are living 2017 and aliens are back. There is a new movie called alien covenant. That for the movies now. Lets get back to miniatures.

Because of the new movie trailer I had to paint some alien miniatures. I just could not help it.

Luckily I had unopened AVP (alien vs predator) board game from Prodos games and I decided to paint first five aliens from it. I have to say that these models are very nice, sturdy and detailed. Not much for mold lines. For the board game these offer too much building for fast start. But they have done the second edition which have much more better model detailing and more board game oriented pieces.

I'm very happy with the result and these buggers was very fun and fast to paint. Also I liked very much building the bases giving each alien own and unique base.

I like to paint some more of these bugs and of course the bug hunters. I hope you like the pictures.

Keep up painting!

Close up from surveillance camera. 

Here is the first five alien stalkers. 

Here better picture of bases. 


lauantai 13. toukokuuta 2017

Rebel leader and Saboteurs

Hello. This time I have only small picture about my latest paintings. I have painted Leia and couple of rebel saboteurs from Star Wars range. This minis aren't even close to my best paintings. Also I had some big problems taking the picture. The light was all bad all the time. I really have to start learning about taking photographs or build a good studio for minis.

When I had to paint two same miniatures I started to haste. I had to paint both of them same time and I really noticed myself not to give same amount time for each miniature. So the result is poor. Here is the picture and you can tell what you think about my paintings.

Keep painting!


tiistai 2. toukokuuta 2017

"This deal's getting worse all the time."

I'm back on painting Star Wars miniatures. This time I have painted a smooth gambler and smuggler Lando Calrissian. This miniature was very fun to paint because of the colorful shirt. This miniature is in very nice pose giving hint of characters personality.

I have to say that I'm fun of Mordheim and Necromunda but these SW miniatures have giving me more colorful approach to the painting. I don't usually use so bright colors. Also it have given me some more motivation to paint more. I very exited to paint some more Star Wars.

Lando is one of my favourite SW model what I have painted and I have named it as "Disco Stu".

Lando Calrissian from the Star Wars movie
Lando have a good smile

Landos cape

Smooth cambler


perjantai 7. huhtikuuta 2017

Terror from the Jungle.

It has been long since I write something to my blog. I have been unmotivated to paint. Brakes will boost me later and give more ideas and innovation. I have every year from days to weeks when I don't paint at all.

I have still been painting something. You might have seen some of my painting from my Facebook page. Now it it is ready. My first Warhammer 40.000 army. Army needs one HQ and two troop choice that the army is valid.

My tyranid swarm is adapted for jungle terrain and lurking in the greenery. Main color is Black and green.Yellow dots are warning color like nature.

So here is my army.

THE HIVE FLEET MALIGNANT


HQ: Tyranid Prime with Rending claws. 130 points (one model)
-Regeneration 30 points (extra)

Troop: Ripper swarm brood 39 points. (three models)
-Deep Strike 2 points/model = 6 points (extra)

Troop: Termagant Brood 40 points (10 models)

TOTAL: 209 points or with extra 245 points. 


Hive Fleet Malignant
Warning colors

Close up from Tyranid Prime


What is the future of my Tyranid fleet?


I haven't played a single game of 40k game. If I like the game, maybe my tyranid army will crow or if I don't like I might paint some more miniatures for the army. I still have tyrant, some hormagaunts, spore mines and gargoyles to build and paint. 

What does my Hive Fleet name Malignant means?


1. disposed to cause harm, suffering or distress deliberately; feeling orshowing ill will or hatret

2. very dangerous or harmful in influence or effect

3. Pathology;
a) tending to produce death, as bubonic plague.
b) (of a tumor) characterized by uncontrolled growth; cancerous, invasive, or metastatic

torstai 23. helmikuuta 2017

Wellcome to the year 40 000!

My year did not start as I wanted. How ever I have been very busy learning to paint fast and lot's of models. I  have started to paint Warhammer 40k armies. For first I have done Astra Militarium Catachan troops. I have converted this first squad.

Also I have done tyranid force and I have done the first troop choice as well.

So I have painted and built 20 models this far.

You can expect that this year is heavily fulfilled with WAR!

Let the pics speak for them self.

Tyranids troops. I have painted these about for times over to find my hive colors.
These first ten are armed with fleshporer... Or something like that 

Veteran squad with autoguns & shotguns
Two specialist flamer and heavyflamer


Please be free to comment!


perjantai 30. joulukuuta 2016

Mordheim: Bridge House part 4 (Final part. Finished bridge house)

Hello. This is 2016 years last project. I really don't have time to build or paint nothing anymore in this year. But the next year is coming and I have lot's of plans to paint miniatures.

Back to Mordheim. This is the last part of building Mordheim bridge house. Actually this part is more like painting than building.

Step 1: Prime the building
I have painted the building with black spray primer. I had to do some minor building in this part. I added a window board. This step is really fast and easy.

House is primed with black spray


Wooden window board. Clued after the priming.

Step 2: Base color and wash
In this phase I have painted the house inside out with the base color. I have used tan, red and blue inside the house. Dark grey and lighter grey outside. Wooden planks are painted with brown. And of course the downstairs with grey color. 

Base color in place. I have used 8 different base color.

After I had done the base color I just washed the whole building with black wash. It prings some of the detail up. And because it is a ruined house it doesn't matter if it look some grimy and dirty. 

After the black wash.
Step 3: The dry brushing
This is the longest part to do. I have dry brushed all walls, floors, dirt and details. Mainly I have used same base color before the wash. Then I have lightened it up with white or similar lighter tone. 
Well in this part I was very interested to paint the building and I did not take pictures of every layer. 

I have painted about 3-5 layers to each sealing or floor sections. 

After the dry brush
I had to do some minor fixing in this phase. I added some more "dirt" on the ground floor. You can see the new dirt in color of grey. 

Some fixing details. Grey dirt. Painted brown after drying. 


Step 4: The finishing touches and details
Last part is the funnest part to do. I can ad some details to bring the ruins more alive. I have added all kind of details what is shown in original card board ruins. Some details I have just done as I see it fit.

Posters, writings, rust, water leaks, blood, Town Cryer magazines and fire place.

Red arrows point some the details what I have done to the ruins. 

Step 5: See the result
After I have done it all. I have taken some pictures and posted it up in my blog. I'm happy to hear some feedback. There is some thinks what I have done better like edges of the ruins. But I'm happy with the result. 

I hope you enjoy the finished Mordheim Bridge house. I have now done all the buildings what come with original game.  

Finished Mordheim Bridge house. 

Bridge house from bird view. 

The bridge is removable for better storage and it will wont take so much damage
 when I move it around the gaming table.

Mordheim
Corner House 1
Corner House 2
The Long House
The Tavern
Bridge House
Monument + Chimney

Next I have to build the Blood on the street expansion. Only problem is that I don't own the expansion yet. If you have the expansion houses and the plastic parts. I might just buy them for the right price. And I need the schematics also!


perjantai 2. joulukuuta 2016

Elf Ranger & Woods and Halloween! (Lot's of Pictures)

Hello! Small update about my lately miniature building. I have re-based lot's of these trees what you can see from the pictures. I have about 50 trees and 20-30 bases to make. First the trees was only in green painted cardboard. They didn't look very nice on the table.

You can see also a Elf Ranger in the picture. It is a Games Workshop model and it's a perfect for Mordheim range.

Also I'm building the Mordheim house and it should be ready to be painted before the Christmas.


Here is my competition work for local gaming club. Subject was "Halloween" My work is called "knock, KNOCK! Trick or Treat!"

Goblin doing Jack o lantern.


Made pumpkin from green stuff . 
Here is the dwarf doing the knock knock!
Pumpkins, leafs... 
Close up about dwarf. 

Front yard. 


Comment's are always welcome!

perjantai 25. marraskuuta 2016

Mordheim: Bridge House part 2

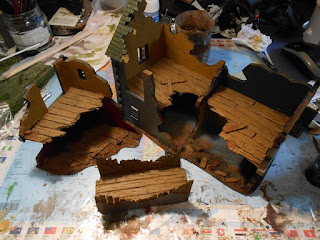
Hello. November is almost over and I have done the second part of the Mordheim Bridge House. My goal is to build new and better Mordheim house using original plastic parts and use foamboard instead original cardboard walls.

In this second part I have done the basic building. The Building is still lacking most of the plastic parts and almost all detailing.

Enough talking and more pictures. I will explain shorty what I have done in each picture. In the first part I did cut and made the new walls.

1) First I did do some cracks and details to the wall sections. It was more easier to do this way. This is easy part and I have just used the pen to draw the lines and some force. Foamboard is soft material and the crack will show nicely in the painted house.
Here is some crack details to the walls.
2) Next I star testing and assembling the walls. The corner pieces and the beams will with smoothly in their places. I have to do some fine cutting in some sections. As you can see in picture below where I have used the hobby knife to cut of small piece from lower corner.

Assembling the pieces with the plastic beans and corners. 

3) When the pieces with I have used clue to stick the pieces together. I have let the pieces dry over night to be sturdy enough to continue building. I have used 90 degree metal measure to make house dry in to the right angle. I have used hobby clue and plastic clue in these parts.
Here I use the original schematics to build the house. 
4) So here is the second floor. I have used just thin cardboard to make the floor. 
 
Main house is only missing the floor panels.
5) I have gathered ice cream sticks from the summer and I have also bought a pack of them. I don't eat some much ice cream that I can build a house... Or do I?
Some ice cream sticks are good way to do floor blanks. 

6) In the smaller section of the house I have done the floor before cluing it in place.

I have tested how many sticks I need to build the floor.


7) When the floor is done it is time to clue it in place. I have left a small card board slice to make it go under the wall section.


8) I have simply braked the sticks to look like torn apart wooden blanks. Also I have made with hobby knife some carvings and used small drill to make nail holes.

I have made small pin in the side to make floor more sturdy in the house.
9)  Smaller house part is ready.
Here you can see the original section and the new WIP section. 
10) In the larger house section I had clued the card board floor before making the wooden blanks. It was easier to built it that way and I did not had to do so much measuring before hand. I had to use some weight when cluing the floor. It will not dry nicely if it let dry without some weight. The floor is more like wave if not done this way. I have some support in beneath the floor. You can see the paint bottle cap under the floor. 
In larger house I have simply cut and clued the blanks in to the floor. 
11) When I have done the basic assembling it is time to move to detailing. The bridge is not ready yet because I haven't decided will I make it removable for easier storing. 

Assembling completed. 
In the next part I have detailing. I will do the ground floors, dirt, and some other things. If you like to know some more I will happily to answer to questions. 

Keep up the building! 

keskiviikko 2. marraskuuta 2016

Who let the Dogs out!

WOUH! wouh! wouh! Wouh! Echoed from the street of Mordheim. Witch hunter captain pointed his finger into the dark street and yelled "PURE THE UNCLEAN!" Poor warlock last reflection in his eyes where vicious dogs was running towards him. WOUH! wouh! wouh! Wouh! Echoed from the street of Mordheim.

Hunters prey. 


I promised to paint five original Mordheim miniatures this year. Actually I have painted six. One Warlock, Captain, two flagellants and two hounds. I have taken a small picture of the last dogs. Also here is the picture of my witch hunters and all this year painted Mordheim miniatures.

I still have lot of broken and missing parts witch hunter miniatures which I'm maybe going to mod some new and different weapons variations for Mordheim.

Here is the new Mordheim hounds!
I'm very happy about the result about these hounds. Two of them are painted about couple years ago when I wasn't as good painter as I'm now. Small amount about wash or ink I might do more visible details to these two older hounds.


Here is the all four Mordheim Hounds!


Here is my all original Witch hunter warband. I'm still missing one model. The one witch hunter with the great sword.


Ready to adventure into the darkness. 

keskiviikko 5. lokakuuta 2016

Timed Witch Hunter!

I did get questions how long I paint for one miniature and I decided to take time. I started to take time after the mini was primed.

+Basecoat and some washing. Timer 56 min and 11 seconds.
+Layers after that. Timer 3 hours 22 min and 58 seconds
+Basing and finishing model. Timer 3 hours 52 min 34 second.

So it will take 4 hours painting time to finish the miniature. You can find some WIP pics from my Facebook page.

I have used some premade and painted tree leafs from Pienoismallimarketti. You can see the brown leafs in base.
Do you feel lucky. The Mordheim Witch Hunter Captain!

Mordheim Witch Hunter

I tried some light effects from the torch.
Follow me in FB and Here! Give me some feedback to improve my blog text.